Agriculture
Hydroponic seeds
Hydroponic seeds 
We recommend that you choose one of these three starter plugs, which can be ordered from any hydroponics supplier or use our links: 

Hydroponic seeds
TRANSPLANT INTO THE HYDRO UNIT:
Hydroponic seeds
Transplant the cubes directly into the ponics unit. You do not remove from the starter plugs. Just dig a little hole in the hydro medium and plug in the cube. It's great, you don't disturb the roots, they grow right on through. When you first transplant to the hydro unit, top water them daily the first week with nutrient solution. This guarantees they won't dry out before the roots get a chance to reach down toward the juice. A turkey baster works great for this.
A SHORT CUT
Buy a spray bottle each of: Safer Insecticidal Soap and Houseplant and Garden Spray (or any brand of Pyrethrin or Rotenone). These are the safest of insecticides. 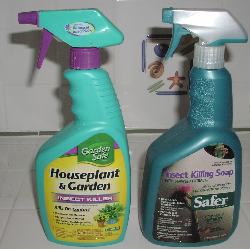
Before you ever even take them into the grow room, put the seedlings in the kitchen sink and literally saturate the plants in each spray, letting them dry between the sprays. Make sure to reach the upper and lower sides of all the leaves, stems, everything. Hopefully by now you have de-loused them!
Ready to transplant? Break off the peat pots or carefully pull the seedlings from the plastic beds. Do this one at a time so the roots don't dry out.
Carefully remove most of the soil from the root ball, trying to keep as much root intact as possible.
Hold roots under warm running water and rinse away almost ALL of the soil. You can leave a little blob of it, but not much, or it will drain into your vat of nutrients. You don't want mud in there.
Dig a little hole in the hydro pot medium, insert the root ball and shore up the plant with medium. Might take a little propping til they "take root". Source of Article: http://www.hydroponics-simplified.com
- Role Of Carrots As A Source Of Vitamin A
Carrots are very popular agricultural crop and it is cultivated widely in all countries of the world. Carrot consumed as raw or after cooking. Role Of CARROTS AS A Source Of Vitamin A Carrot is a very good source of vitamin a. When we eat carrot in raw...
- Punjab Government Announces Wheat Production Contest
Punjab government has announced wheat production competition in order to encourage the growers to bring maximum area under wheat sowing and ensure food security for the province and the country. News Source I ...
- Dusky Cotton Bug, Oxycarenus Hyalinipennis
Common Name : Dusky cotton bug Gaa4YxdnRpjgB4KjA13vScientific Name : Oxycarenus hyalipennis Family : Lygaeidae Order ; HemipteraInsect Description:Eggs are cigar shaped and whitish immediate to oviposition. ...
- Hydroponics Vs Soil
With hydroponics currently at new heights in the gardening world, the question facing gardeners today is Hydroponics or Soil? This question is also becoming an age old debate of battling sides fighting to prove the other wrong. I won?t be taking a stance...
- Its A Boy!!
This morning as my brother was driving me to school, I was pondering about what to write today! I started think about my parenting class at school, we where talking about how much it cost to have a baby. To be honest, I wasn't surprised on how much...
Agriculture
HYDROPONIC SEEDS Getting Your Garden Growing
STARTING SEEDS & PLANTS
Okay, you bought all the stuff. You sawed and glued and drilled and cussed. Three trips to Home Depot. But you did it! Your beautiful shiny new hydroponics unit is ready to start growing!

Now what? How do you get some good healthy plants for your setup? First, we'll tell you the cheapest and best way to start plants for your new garden (hydroponic seeds). Then, at the bottom of the page, we give you a short-cut, an easy way to start quickly (nursery plants). [But there are drawbacks to doing this, as you will see].
We advocate starting from seed. Why? Much more variety, NO bugs or viruses brought in with the plants, and the pride factor and skills learned by starting from scratch. We recommend that you at least try the seed route first. Don't just skip this part. If you try it and find it is too much work, then at least you tried... and learned.
Okay, you bought all the stuff. You sawed and glued and drilled and cussed. Three trips to Home Depot. But you did it! Your beautiful shiny new hydroponics unit is ready to start growing!
Now what? How do you get some good healthy plants for your setup? First, we'll tell you the cheapest and best way to start plants for your new garden (hydroponic seeds). Then, at the bottom of the page, we give you a short-cut, an easy way to start quickly (nursery plants). [But there are drawbacks to doing this, as you will see].
We advocate starting from seed. Why? Much more variety, NO bugs or viruses brought in with the plants, and the pride factor and skills learned by starting from scratch. We recommend that you at least try the seed route first. Don't just skip this part. If you try it and find it is too much work, then at least you tried... and learned.
Hydroponic seeds
Hydroponic seeds
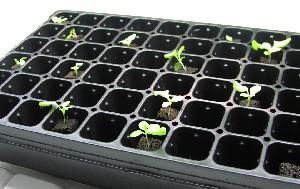
Most vegetables do best sprouted in tiny starter pots or flats prior to transplanting to the planting bed. This is especially true for hydroponics, because you cannot plant little bitty seeds directly in place into the coarse hydro planting media. Hydroponic seeds get lost, wash away with the nutrient solution, or they fail to get enough moisture to sprout.
WHICH SEEDLING POTS?
Hydroponic seeds
WHICH SEEDLING POTS?
Hydroponic seeds
With hydroponics, it is best to start your seeds in cubes of inorganic material, not soil. When they are ready, you just place the entire plug into the hydroponic media bed. The roots grow right on through.
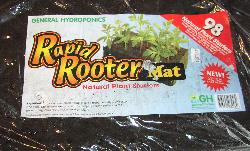
We recommend that you choose one of these three starter plugs, which can be ordered from any hydroponics supplier or use our links:
- Rapid Rooter Starter Plugs (see above)
- "Perfect Starts" 36-pack for larger seedlings, or 100-pack for herbs & lettuces
- Grodan Rockwool starter cubes (below)
Other plugs you could use:
"Oasis Horticubes" are small 1" x 1" cubes for starting lettuce or herbs.
*Don't use peat pellets, jiffy pots or potting soil in a hydroponic system, as they break down and clog the pump.
"Oasis Horticubes" are small 1" x 1" cubes for starting lettuce or herbs.
*Don't use peat pellets, jiffy pots or potting soil in a hydroponic system, as they break down and clog the pump.
|


Hydroponic seeds
You will want to create a little "seed nursery" in a warm, brightly lit spot. A bright kitchen window or warm space under an inexpensive fluorescent gro-light would be good. But you don't want to bake them in direct sunlight or hot lamps. Seeds will not sprout unless it's at least 65 degrees (70-80 is ideal).
***You MUST provide bright light close to the flat, or the babies will grow long and spindly and flop over. Don't skip past this bit of advice! Bright light creates thick, short, stocky, healthy seedlings.

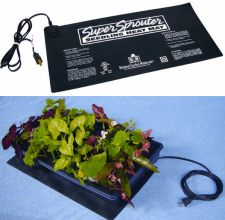
If you want to get fancy and indulge your new hydro habit, they sell little domed starter systems and warming "seed mats". Convenient and fun, but not absolutely necessary; a tupperware tray would suffice. They are not very expensive, here they are if you want to investigate:Domed propagation trays & warming seedling mats.
START THOSE SEEDS:
Hydroponic seeds
- Moisten the starter cubes with water.
- Insert seeds into the cube holes. For tomato, peppers, cukes, eggplants, basil, broccoli and cabbage, use 2 seeds per cube; for herbs, 6-8 seeds per cube. Start a couple more cubes of each type of crop than you intend to keep, so you can select the best.
- Place in the nursery tray and keep warm (70-80 degrees). Water every day or two by adding "seedling solution" to the pan, not the cubes. [Use 1/2 strength nutrient solution mix. If you use GH Flora Nutrients, mix up a batch of "seedling solution" in a one-gallon milk jug; using 1/4 tsp. of each of the three solution mixes (micro, gro and bloom) to one gallon of water.]
- Voila! They will start sprouting in a couple days. Once up and running, cut off the extras and leave only the best seedling in each cube. (Thin out the weaker/spindly/slow-growers).
- When to transplant? When the plant is a 2-3 inches tall, with 4 leaves, and roots start to show thru the sides of the cubes. This usually takes 1-3 weeks. Peppers and tomatoes can take up to 4 weeks.
TRANSPLANT INTO THE HYDRO UNIT:
Hydroponic seeds
Once your babies are ready to graduate to the big hydroponic unit, it helps to gradually get them used to the new climate. "Harden them off" if they are going outside or to a greenhouse, to stronger light and cooler temps. If you want to "keep it simple", just skip this step, your plants should still survive.
But if you are transplanting to an indoor hydro setup, you must break them in to the warmer temp and new intense light system or you will burn them up. Start by keeping the lamps way up high at first, then every few days you can lower it 'til you are about 18-24" above the crops. If you start the tender babies directly under the hot lights, they will shrivel up and die. I know cause I've done it.
But if you are transplanting to an indoor hydro setup, you must break them in to the warmer temp and new intense light system or you will burn them up. Start by keeping the lamps way up high at first, then every few days you can lower it 'til you are about 18-24" above the crops. If you start the tender babies directly under the hot lights, they will shrivel up and die. I know cause I've done it.
Transplant the cubes directly into the ponics unit. You do not remove from the starter plugs. Just dig a little hole in the hydro medium and plug in the cube. It's great, you don't disturb the roots, they grow right on through. When you first transplant to the hydro unit, top water them daily the first week with nutrient solution. This guarantees they won't dry out before the roots get a chance to reach down toward the juice. A turkey baster works great for this.
A SHORT CUT
Hydroponic seeds
Now, for the really easy, keep-it-simple, jump-start method for planting your hydro garden!
It's happened to me... there you are, walking through the garden section of Home Depot. Lookin' for seed packets... what a variety... Then it happens... you glance over at the vegetable seedlings. Nice fat, juicy plump seedlings...
Hard to pass by, right? You can actually start your hydroponics garden from store-bought seedlings, however, there are the disadvantages to going this route:
- Much more expensive. If you are looking to make your hydro garden cost-effective, this is not the way to go.
- All the textbooks tell you to never use store-bought seedlings with hydroponics. Must be a reason.
- Limited varieties. Hydroponic seeds open up a vast world of interesting and tasty cultivars. Seedlings, you are limited to what they got on the shelf that day.
- Danger of diseases or pest infestation. Aphids run rampant in plant nurseries, and they are really hard to see, so you bring them home without even knowing it. There are also viruses and soil-borne diseases which you could infect your entire garden with. Some which may be difficult to eradicate.
- Some plants do not "rough transplant" well. They don't survive the root rinsing necessary for this method. Plants which do well for this: Tomatoes, peppers, eggplants, cabbage, broccoli, cauliflower.
- Plants which do not take kindly to their roots being rinsed off: Beans, peas, lettuce, herbs, squash, melons. These should be started from hydroponic seeds.
Still determined to buy store-bought seedlings? Then take these precautions:
- Role Of Carrots As A Source Of Vitamin A
Carrots are very popular agricultural crop and it is cultivated widely in all countries of the world. Carrot consumed as raw or after cooking. Role Of CARROTS AS A Source Of Vitamin A Carrot is a very good source of vitamin a. When we eat carrot in raw...
- Punjab Government Announces Wheat Production Contest
Punjab government has announced wheat production competition in order to encourage the growers to bring maximum area under wheat sowing and ensure food security for the province and the country. News Source I ...
- Dusky Cotton Bug, Oxycarenus Hyalinipennis
Common Name : Dusky cotton bug Gaa4YxdnRpjgB4KjA13vScientific Name : Oxycarenus hyalipennis Family : Lygaeidae Order ; HemipteraInsect Description:Eggs are cigar shaped and whitish immediate to oviposition. ...
- Hydroponics Vs Soil
With hydroponics currently at new heights in the gardening world, the question facing gardeners today is Hydroponics or Soil? This question is also becoming an age old debate of battling sides fighting to prove the other wrong. I won?t be taking a stance...
- Its A Boy!!
This morning as my brother was driving me to school, I was pondering about what to write today! I started think about my parenting class at school, we where talking about how much it cost to have a baby. To be honest, I wasn't surprised on how much...